
 One of the most important decisions you’ll have to make while getting ready to move out is what items you’ll leave behind and what items you’ll take with you to the new home.
The BAD NEWS is that sometimes it can be really difficult to make up your mind whether to pack and move some of those items. That’s often the case when you want to take some furniture pieces with you but you know that moving those large and heavy items will increase substantially the final moving cost.
The GOOD NEWS is that there are also things that you are packing and moving no matter what. Those are the no-brainers, the things you must have with you regardless of the cost. A typical example is the electronic equipment you have in the home such as your flat-screen TV, stereo system, home theater system, game console, and of course – your desktop computer.
Check out the following 10 hi-tech STEPS on you how to pack a desktop computer for moving: what computer packing supplies you’ll need, how to prepare your personal computer for a move, and how to pack the computer tower, monitor and peripheral devices for safe transportation.
Step 1: Get the right computer packing boxes
There’s no question whether you need to pack up your computer for moving – you just have to do it. The computer tower is rather heavy and bulky and it houses very sensitive components, while the computer monitor will be either super heavy (the old CRT monitors) or super fragile and breakable (flat-screen TFT or LCD monitors). And to complete the computer packing task, you’ll need a number of good boxes too.
The best way to pack a computer for moving is to use the boxes which came with the mid-tower, computer monitor, and any other peripheral device that you bought separately. Why? Those original computer boxes are custom-made to fit the computer parts and that’s why they offer the best possible protection.
If you have no idea where those boxes are or if you remember clearly that you’ve thrown them away at some point, then get standard moving boxes of the right size – preferably brand-new and double-walled, and then use more padding and cushioning materials to emulate the protection of original packaging.
Where to find free moving boxes: Complete checklist
Step 2: Get the right wrapping and padding materials for your PC

Use anti-static bubble wrap to protect your desktop computer.
Note that having the appropriate cardboard boxes to transport the components of your desktop computer will not be enough – you’ll also need several types of padding materials to wrap around those fragile computer elements in order to keep them safe.
- Bubble wrap. If possible, get anti-static bubble wrap to avoid possible damage to your sensitive computer from static electricity. As a rule of thumb, you should not use standard packing peanuts because they are known to conduct electricity and could damage some of the components inside the mid-tower.
- Packing paper. Get soft wrapping paper which you’ll use as the first protective layer. The paper will protect your desktop computer from dust and even possible moisture.
- Furniture blankets. Your desktop computer is not a furniture piece but the thick furniture blankets will be ideal to keep the tower, monitor, and other computer parts well-padded for the road.
Step 3: Backup your important data
When moving a desktop computer to another home, you’ve got to remember that anything could happen while your computer is on the road between the two homes. So, you should be ready for the worst-case scenario – losing the important data that’s on your PC.
Even in the unlikely case of damage to any of your computer equipment – super unlikely if you follow these computer packing tips, those hardware parts are very much replaceable. However, lose irreplaceable information and you may enter a world of trouble.
Be smart and back-up your important data either onto an external hard drive (a portable flash drive is also fine) or to a cloud backup service such as Google Drive, Dropbox, iDrive, and others.
If you intend to entrust your packed-up desktop computer to professional movers, then you’re encouraged to remove and transport the hard drive by yourself in order to prevent unlikely yet possible theft of personal information.
What to do before packers arrive
Step 4: Unplug and organize the cables
The best way to pack a computer for moving is to first take care of the bunch of cables that will be dangling behind the computer tower and computer monitor. During a move, loose cables are a potential tripping threat so you’ll need to remove them, organize them, and pack them safely for transport.
- TAKE photos of the way the cables are connected to the back of your computer, monitor, and any other peripheral devices such as printers, scanners, etc. Do such reference photos even if you know perfectly well where each cable goes because you may happen to be too stressed out and too tired when reconnecting those same cables in the new home.
- USE colored stickers, colored tape or numbered tags to mark each computer cable if you think you may have troubles re-connecting them properly later on.
- WRAP computer cables in soft packing paper for added protection, then use a bit of tape or elastic bands to secure the paper layer.
- PACK all PC cables together with their matching unit. Or pack all cables in a separate box but don’t forget to label correctly each cable.
How to stay organized when moving house
Step 5: Pack the computer tower
Packing a desktop computer for a move basically means packing the mid-tower, monitor, and all the peripherals separately. So, first things first.
How to pack a computer tower for moving?
-
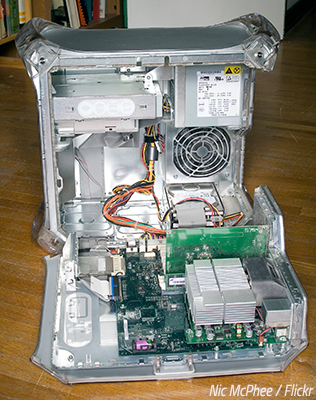
Don’t forget that your desktop computer tower contains very fragile and sensitive components.
DISCONNECT all the cables from the mid-tower, then organize and pack them separately as described in Step 4.
- WRAP the computer tower in soft wrapping paper to keep dust and moisture away. This initial paper layer will keep the bubble wrap (the next layer) from directly touching the tower surface.
- USE bubble wrap as a second layer over the paper one – just wrap the entire computer tower with the air-filled plastic wrap and then use tape to secure it well. The purpose of bubble wrap will be to protect the sensitive tower against direct hits and vibrations.
- TAKE a furniture blanket and wrap it over the mid-tower as the final layer. Use tape to secure its edges.
- TRANSFER the padded computer tower into a cardboard box that’s big enough to accommodate it. Once you do, fill in any empty spaces inside the box with pieces of clothing or torn pieces of bubble wrap so that the mid-tower gets immobilized during the haul.
- CLOSE the box, tape it shut and label it properly: COMPUTER TOWER, HANDLE WITH CARE.
Step 6: Pack the computer monitor
Once you’ve wrapped up and boxed the computer tower, it’s time to turn your attention to the monitor – the desktop computer output device that’s the trickiest one to pack and protect due to its super-fragile and extra-sensitive screen.
Here’s how to pack a computer monitor for moving:
- REMOVE the monitor stand carefully, then wrap it up in packing paper to keep it protected from possible scratches. Consult the owner’s manual of the monitor if you’re not sure how to remove the monitor stand.
- WRAP the monitor, regardless of its type, with wrapping paper as if you were wrapping a gift. Use small pieces of tape to keep the paper from unwrapping.
- CUT out a large piece of thick cardboard that matches the monitor in size. Then, position gently that cardboard cutout in front of the screen and then secure it carefully with small pieces of tape. The tape will stick onto the wrapping paper below so that no damage to the surface will be possible.
- WRAP the entire monitor with sheets of bubble wrap to cushion it well against any harmful external forces.
- PLACE a moving blanket over the protected computer monitor just to be on the safe side. Secure that furniture blanket with tape.
- TRANSFER the protected monitor into a cardboard box of the right size. Ideally, that will be the original monitor box.
- FILL any gaps inside the box with pieces of clothing, used sheets of bubble wrap, or wads of paper.
- TAPE the box shut, then label it correspondingly: COMPUTER MONITOR, HANDLE WITH CARE.
How to pack fragile items for moving
Step 7: Pack the computer peripherals
When packing a desktop computer for shipping, you shouldn’t forget about the various peripheral devices either. In order to function properly, a desktop computer will also need to have at least a keyboard and a mouse. Of course, the chances are that you’ll have a number of other peripherals such as speakers, headphones, a webcam, a Wi-Fi router, a scanner, a printer, etc.
- WRAP your various peripheral devices in soft wrapping paper first. In fact, packing paper should always be your first line of defense against scratches, dust, and moisture. As a bonus, the paper will protect the surface of your computer parts from tape residue marks.
- USE bubble wrap for the PC accessories that are both fragile and sensitive. Now, while there won’t normally be necessary to wrap your computer mouse and keyboard in air-filled plastic bubbles (wrapping paper should be enough), Wi-Fi routers are notoriously delicate so you should definitely wrap them up in antistatic bubble wrap.
-

It looks like you’re all set to pack up your monitor for safe transport.
PACK your computer peripherals in their original boxes, whenever possible. Otherwise, use one or two strong cardboard boxes to pack the various pieces of electronic equipment. Fill any empty spaces with padding materials (using wads of newspaper is ok) so that nothing moves inside the boxes during transport.
- LABEL appropriately the peripherals-filled boxes, especially when you’ve packed several cardboard containers. The thing is, you don’t want to waste valuable time digging through boxes to find the computer peripheral device you’re looking for after the move.
How to label moving boxes like a pro packer
Step 8: Keep your computer tower assembled
To pack a desktop computer for moving, you don’t need to disassemble the computer components inside the mid-tower. If you’ve read somewhere or heard from someone that you should do it in order to better protect the individual PC parts, then just think about the time you’d lose and the risks you’d be running. Besides, it’s a complicated task and only experienced persons should ever try to do it.
Just pack your desktop computer the way a professional packer would do it – using plenty of protective and padding materials to make sure the PC tower, monitor and peripheral devices reach the new home perfectly intact.
Thus said, you should still consider removing the hard drive from the mid-tower if you plan to have your PC transported by a professional moving company. Once you take it out, keep it with you until you arrive in the new home. It’s a precautionary measure to ensure that your valuable personal information is not unlawfully accessed by complete strangers.
Step 9: Move your desktop computer with you
As you can see, packing a desktop computer for moving is not overly complicated – as long as you pad well the computer parts – mid-tower, monitor, and peripherals, then you should be alright. And yet, it won’t make much sense to do an excellent job packing your personal computer only to have it damaged by moving it improperly.
The best way to move a desktop computer is to do it by yourself – that is, to transport it in your own car – on the back seat if you’re moving locally or maybe inside the truck during a long-distance drive. In reality, that’s the only way to know that your expensive computer equipment is handled cautiously and treated with respect.
Of course, sometimes you just won’t have the space to transport your desktop computer in your own vehicle, so you’ll be forced to, willy-nilly, hand it over to your movers. In such cases, speak with your moving company for purchasing additional insurance for added peace of mind.
Step 10: Let the desktop computer get acclimatized after the move
Keep in mind that possible condensation may be the greatest risk when you’re moving your sensitive computer equipment to another home in another part of the country.
Back in business, eh?
If the climate in the new area is vastly different than the one in your old town or city – for example, much colder, hotter, or humid, then you should wait at least 24 hours before reconnecting and turning on your desktop computer. By doing so, you’ll give the sensitive components in your PC enough time to get acclimatized to the new temperatures and overall climatic conditions.
You shouldn’t have any serious problems with the task of packing a moving a desktop computer to a new home. As long as you follow the computer packing steps above, you should have your PC in the new place in exactly the same condition it left the old one.